Master Your Gas Water Heater Pilot Light: Hot Water Solutions
Few things are as jarring on a chilly morning as stepping into the shower, expecting a comforting stream of warmth, only to be met with an icy blast. If you’ve ever stepped into your shower and experienced this unwelcome surprise, you know the immediate dread that sets in. For homeowners with a gas water heater, this common nightmare often points to one small, yet incredibly powerful, component: the pilot light gas water heater. This tiny flame holds tremendous power over you, dictating whether you enjoy a soothing hot bath or endure a bracing cold rinse.
Understanding the intricacies of your water heater’s pilot light is not just about convenience; it's about ensuring a consistent supply of hot water for your household's daily needs, from showering and doing laundry to washing dishes. This comprehensive guide will teach you how to maintain, troubleshoot, and even replace a water heater pilot light, ensuring you’re never left in the cold. We’ll start with the basics, explaining the function and importance of this often-overlooked component, and then delve into practical steps for addressing common issues.
Table of Contents
- What Exactly Is a Pilot Light on a Gas Water Heater?
- Why Your Pilot Light Matters So Much
- Common Reasons Your Pilot Light Keeps Going Out
- How to Relight Your Gas Water Heater Pilot Light
- Experiencing No Hot Water Despite a Lit Pilot Light?
- DIY Repair: Replacing a Faulty Thermocouple
- Safety First: When to Call a Professional
- Maintaining Your Pilot Light for Long-Term Reliability
What Exactly Is a Pilot Light on a Gas Water Heater?
At the heart of every traditional gas water heater lies a crucial, yet often unappreciated, component: the pilot light. The pilot light in a water heater is a small, continuous flame that ignites the main burner. Think of it as the constant spark plug for your water heater. The pilot light on your water heater is the little blue flame used to light the gas streaming to your heater from the gas pipes coming from outside your home. This tiny flame is essential because the main burner, which heats the water in the tank, doesn't stay on all the time. Instead, it kicks in only when the thermostat detects that the water temperature has dropped below a set point. When the thermostat calls for heat, a valve opens, allowing gas to flow to the main burner, and it's this ever-present pilot flame that then ignites that gas, producing the powerful heat needed to warm your water. Without a working pilot light, the main burner simply cannot ignite, and consequently, your water will remain cold. While some people believe that a water heater is a complex appliance best left to professionals, understanding the basics of its pilot light empowers you to diagnose and often resolve common issues, saving you time, money, and the discomfort of cold showers.Why Your Pilot Light Matters So Much
The importance of the pilot light gas water heater cannot be overstated. It's the silent workhorse, constantly ready to spring into action and ignite the main burner, ensuring you have hot water on demand. Its continuous operation means it’s always poised to provide the necessary ignition when the water temperature dips. This constant readiness is what makes gas water heaters so efficient in maintaining a consistent hot water supply. Beyond just providing hot water, the pilot light is also intrinsically linked to the safety mechanisms of your appliance. Modern gas water heaters are equipped with safety features that rely on the pilot light's presence. For instance, if the pilot light goes out, a safety device (most commonly the thermocouple, which we'll discuss in detail) will detect the absence of the flame and automatically shut off the gas supply to prevent a dangerous buildup of unburnt gas. This safety feature is critical for preventing gas leaks and potential explosions, making the pilot light not just a convenience provider but a vital safety component. Therefore, understanding its function and how to manage it is a fundamental aspect of responsible homeownership, particularly if you rely on a gas water heater.Common Reasons Your Pilot Light Keeps Going Out
If you live in a home with a gas water heater and notice cold water coming from your hot water faucet, there’s a good chance your pilot light has gone out. Why does my water heater pilot light keep going out? This could be happening for several reasons, and understanding these common culprits is the first step toward a lasting solution. When it goes out frequently, it can be due to several factors, ranging from minor issues like a draft to more significant component failures. There are many reasons why a pilot light can go out on a water heater, but most boil down to an interruption in the gas supply to the pilot, or a failure of the safety mechanism designed to detect the pilot flame.The Primary Culprit: A Faulty Thermocouple
A primary cause is a faulty thermocouple. If your hot water heater suddenly stops working, chances are a bad thermocouple has shut off the gas to the pilot light. The thermocouple is a small, copper rod-like safety device positioned directly in the pilot flame. Its job is to generate a tiny electrical current when heated by the pilot light. This current then signals a safety valve to remain open, allowing gas to flow to both the pilot and the main burner. If the thermocouple cools down (because the pilot light has gone out, or the thermocouple itself is failing), it stops generating this current. The safety valve then automatically closes, cutting off the gas supply to prevent unburnt gas from accumulating, which is a crucial safety feature. Over time, thermocouples can become dirty, bent, or simply wear out, leading to intermittent pilot outages or a complete inability to keep the pilot lit.A Clogged Pilot Orifice: Small Blockage, Big Problem
Another common reason your pilot light gas water heater might keep extinguishing is a clogged pilot orifice. The pilot orifice is a tiny opening through which gas flows to create the pilot flame. Because this opening is so small, it's susceptible to blockages from dust, dirt, or other debris that can accumulate in the gas line over time. Even a microscopic obstruction can significantly reduce the gas flow to the pilot, resulting in a weak, flickering, or easily extinguished flame. A weak pilot flame often isn't strong enough to adequately heat the thermocouple, leading to the safety valve shutting off the gas. Cleaning or replacing a clogged pilot orifice can often resolve persistent pilot light issues.Intermittent Gas Supply Issues
While less common, problems with your home's overall gas supply can also cause your pilot light to go out. This issue often arises from simple mechanical failures or gas supply problems. This could include a low gas pressure from the utility company, a partially closed gas shut-off valve (either at the water heater or the main house line), or even issues with other gas appliances in your home drawing too much gas, temporarily reducing the supply to your water heater. A gas water heater relies on a consistent and adequate gas flow to operate correctly. If the gas pressure fluctuates or drops below the necessary level, the pilot light may not receive enough fuel to stay lit, leading to it frequently extinguishing. If you suspect a gas supply issue, it's crucial to contact your gas utility company or a qualified professional immediately, as this can be a serious safety concern.How to Relight Your Gas Water Heater Pilot Light
The good news is that relighting your water heater pilot light is often a straightforward process, and most water heaters have instructions on how to relight the pilot light right on the front of the unit. This can save you the expense and wait time of a service call. While procedures can vary slightly between brands, the fundamental steps remain largely the same. Knowing how to relight your water heater pilot light (for every major brand!) is a valuable skill for any homeowner. Before you begin, ensure you have a flashlight (if the area is dark) and a long lighter or matches, though many modern water heaters have an electronic igniter. Always prioritize safety, and if you smell gas at any point, stop immediately and ventilate the area.Step-by-Step Relighting Guide for Most Models
Here’s a general guide to relighting your pilot light gas water heater:- Locate the Pilot Light Assembly: This is usually found near the bottom of the water heater, behind a small access panel. You might need a screwdriver to remove the panel.
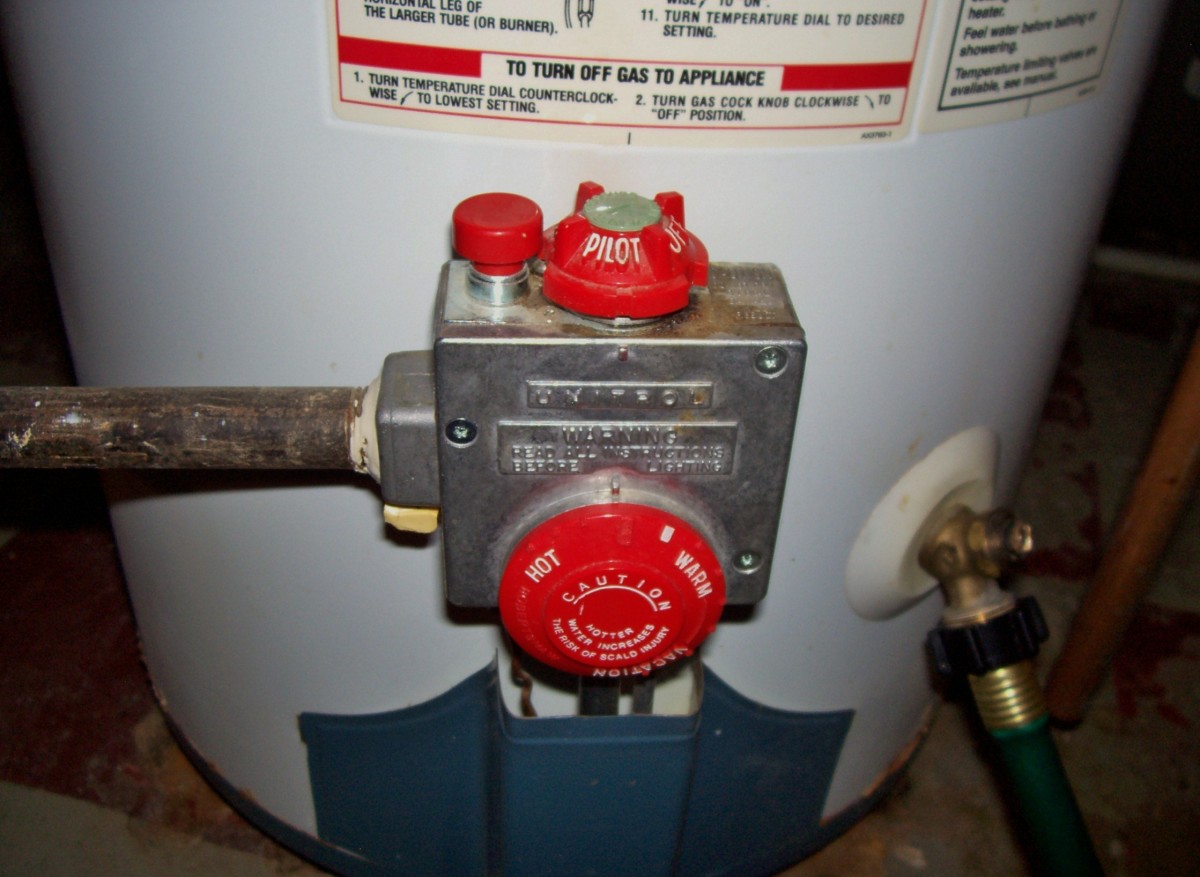
- Find the Control Knob: You'll see a gas control valve or knob with settings like "OFF," "PILOT," and "ON" (or "RUN").
- Turn the Knob to "OFF": Rotate the control knob to the "OFF" position and wait for at least 5-10 minutes. This allows any residual gas to dissipate, preventing a dangerous buildup. Safety first!
- Turn the Knob to "PILOT": After waiting, turn the control knob to the "PILOT" setting.
- Press and Hold the Pilot Button: Most water heaters have a red or black "Pilot" button or a similar mechanism that you need to press and hold down. This action allows gas to flow to the pilot burner.
- Ignite the Pilot: While still holding the pilot button, use your long lighter or match to ignite the pilot flame. Some newer models have a built-in igniter button (often red or black and labeled "Ignite" or "Spark") that you'll press repeatedly until the pilot lights. Look through the small viewing window to confirm the pilot is lit.
- Continue Holding: Once the pilot is lit, continue to hold the pilot button down for 30-60 seconds. This allows the thermocouple to heat up sufficiently and generate the necessary electrical current to keep the gas valve open.
- Release and Check: Slowly release the pilot button. If the pilot light remains lit, you've succeeded! If it goes out, repeat steps 3-7. It might take a few tries.
- Turn to "ON": Once the pilot light is stable, turn the control knob from "PILOT" to the "ON" or "RUN" position. You should hear the main burner ignite shortly after, indicating that your water heater is back in action.
- Replace the Access Panel: Securely replace the access panel.
Experiencing No Hot Water Despite a Lit Pilot Light?
Experiencing no hot water despite a lit pilot light can be incredibly frustrating. You’ve confirmed the little blue flame is burning steadily, yet your faucets still run cold. This issue often arises from simple mechanical failures or gas supply problems that aren't directly related to the pilot flame itself. A gas water heater relies on a complex interplay of components to heat water efficiently. Several factors could be at play here:- Faulty Thermostat: Your water heater has at least one thermostat (and often two) that monitors the water temperature and signals the main burner to turn on when needed. If a thermostat is faulty, it might not be accurately reading the water temperature or sending the signal to the gas control valve, preventing the main burner from firing up.
- Malfunctioning Gas Control Valve: Even if the pilot light is lit and the thermostat is calling for heat, a defective gas control valve might not be opening to allow gas to flow to the main burner. This valve is a critical component that controls the flow of gas to both the pilot and the main burner.
- Blocked Vent or Flue: Gas water heaters produce combustion byproducts that need to be safely vented outside. If the vent pipe or flue is blocked by debris (like a bird's nest or leaves), it can trigger a safety mechanism called a "flue gas sensor" or "draft inducer" to shut down the main burner. This is a crucial safety feature to prevent carbon monoxide buildup.
- Sediment Buildup: Over time, minerals in your water can settle at the bottom of the water heater tank, forming a layer of sediment. This sediment acts as an insulator, preventing the main burner's heat from effectively transferring to the water. While the burner might be firing, the water isn't heating efficiently, leading to lukewarm or cold water.
- Undersized Water Heater: If your household's hot water demand has increased, or if your water heater is simply too small for your needs, it might be running out of hot water faster than it can replenish it, even if it's functioning correctly.
DIY Repair: Replacing a Faulty Thermocouple
As established, a faulty thermocouple is a primary cause when your pilot light keeps going out or your hot water heater suddenly stops working. The good news is that replacement is an easy DIY repair for many homeowners. This comprehensive guide will teach you how to replace a water heater pilot light (specifically, the thermocouple component of it) and properly ignite a gas burner. We’ll start with the basics, explaining the function and then moving to the replacement process. **Tools You'll Need:** * New thermocouple (ensure it's compatible with your water heater model) * Adjustable wrench or small open-end wrench set * Screwdriver (Phillips or flathead, depending on your access panel) * Wire brush (optional, for cleaning pilot assembly) * Flashlight **Step-by-Step Thermocouple Replacement:** 1. **Turn Off Gas and Water:** This is paramount for safety. Locate the gas shut-off valve on the gas line leading to your water heater and turn it to the "OFF" position. Also, turn off the cold water supply valve leading into the top of your water heater. 2. **Turn Off Pilot and Main Burner:** Rotate the gas control knob on your water heater to the "OFF" position. 3. **Access the Pilot Assembly:** Remove the outer access panel at the bottom of your water heater. You might also need to remove an inner metal shield. This will expose the pilot burner assembly, which includes the pilot light, the thermocouple, and the main burner. 4. **Locate the Thermocouple:** The thermocouple is a thin copper tube (or wire) that runs from the pilot burner area to the gas control valve. It usually has a small nut connecting it to the valve. 5. **Disconnect the Old Thermocouple:** Using your wrench, carefully loosen the nut that secures the thermocouple to the gas control valve. Once loose, gently pull the thermocouple out of its housing. At the pilot burner end, it's usually held in place by a clip or simply slides into a bracket. Remove it. 6. **Install the New Thermocouple:** Carefully insert the new thermocouple into the bracket or clip at the pilot burner end, ensuring its tip is positioned correctly in the pilot flame's path (as the old one was). Route the copper tube back to the gas control valve. 7. **Connect to Gas Control Valve:** Thread the nut of the new thermocouple onto the corresponding port on the gas control valve. Hand-tighten first, then use your wrench to snug it up, but do not overtighten, as this can damage the component. 8. **Replace Panels:** Reinstall any inner shields and the outer access panel. 9. **Relight the Pilot:** Follow the steps outlined in the "How to Relight Your Gas Water Heater Pilot Light" section above. This is where you'll properly ignite a gas burner. Pay close attention to holding the pilot button long enough for the new thermocouple to heat up. 10. **Check for Leaks:** After turning the gas back on and the main burner ignites, apply a soapy water solution to all gas connections you touched (including the thermocouple connection at the gas valve). If you see bubbles, you have a leak, and you must turn off the gas immediately and tighten the connection or call a professional. Replacing a thermocouple is a common and relatively simple repair, but always exercise caution when working with gas appliances.Safety First: When to Call a Professional
While many pilot light issues can be resolved with DIY efforts, it's crucial to recognize when to call a professional. Your safety, and the safety of your household, should always be the top priority when dealing with gas appliances. If you're ever unsure about a step, uncomfortable with the process, or if your attempts to fix the issue are unsuccessful, do not hesitate to contact a licensed plumber or HVAC technician. Here are specific scenarios where professional intervention is strongly recommended:- Persistent Gas Odor: If you smell gas at any point – especially a strong, rotten egg smell – turn off the gas supply immediately, evacuate your home, and call your gas utility company and/or emergency services from a safe location. Do not attempt to relight the pilot or operate any electrical switches.
- Pilot Light Won't Stay Lit After Multiple Attempts: If you've tried relighting the pilot multiple times, and it consistently goes out, or if a new thermocouple doesn't solve the problem, there might be a more complex underlying issue, such as a faulty gas control valve, a significant flue blockage, or a problem with gas pressure.
- Visible Damage or Leaks: Any visible damage to the water heater itself, the gas line, or water leaks around the unit warrant professional inspection.
- Strange Noises or Smells from the Water Heater: Unusual banging, popping, rumbling, or burning smells coming from the water heater indicate a problem that requires expert diagnosis.
- Lack of Confidence: If you feel uneasy or lack confidence in performing any of the DIY steps, it's better to err on the side of caution and call a professional. Working with gas lines and combustion can be dangerous if not done correctly.
- Warranty Concerns: Attempting certain repairs yourself might void your water heater's warranty. Check your warranty terms before undertaking significant repairs.
Maintaining Your Pilot Light for Long-Term Reliability
Preventative maintenance is key to ensuring the long-term reliability of your pilot light gas water heater and avoiding unexpected cold showers. While the pilot light itself requires little direct maintenance, keeping the surrounding components clean and ensuring proper ventilation can significantly extend its life and prevent common issues. Here are some tips for maintaining your water heater and its pilot light:- Regularly Inspect the Pilot Flame: Periodically check the pilot flame through the viewing window. It should be a strong, steady blue flame. A weak, yellow, or flickering flame could indicate a dirty pilot orifice or insufficient gas flow, signaling a potential problem before it leads to an outage.
- Keep the Area Clear: Ensure the area around your water heater is free of clutter, dust, and flammable materials. Good airflow around the unit helps prevent overheating and ensures proper combustion.
- Clean the Pilot Assembly: If you're comfortable doing so (with the gas supply off!), you can gently clean the pilot assembly and thermocouple with a soft brush or compressed air to remove dust and debris that might be impeding the flame or the thermocouple's function.
- Flush the Water Heater Tank Annually: Sediment buildup at the bottom of the tank can reduce efficiency and put strain on the main burner, indirectly affecting the overall system. Flushing the tank once a year helps remove these mineral deposits.
- Check the Venting System: Periodically inspect the exhaust vent pipe for any obstructions, kinks, or disconnections. Proper ventilation is crucial for safety and efficient operation.
- Consider Professional Annual Maintenance: Even if you're handy, having a qualified technician perform an annual inspection and tune-up can catch minor issues before they become major problems. They can check gas pressure, inspect the burner, test safety controls, and ensure overall optimal performance.
Conclusion
The humble pilot light gas water heater, though small, is undeniably mighty, serving as the unsung hero that keeps your hot water flowing. As we've explored, its function is critical not only for your comfort but also for the safe operation of your entire gas water heater system. From understanding its basic role as the igniter for your main burner to troubleshooting common issues like a faulty thermocouple or a clogged pilot orifice, you now possess the knowledge to tackle many hot water dilemmas head-on. Remember, if your hot water heater suddenly stops working, there’s a good chance your pilot light has gone out, and often, relighting it is an easy DIY repair. However, knowing when to call a professional is equally important, especially when safety is concerned. By empowering yourself with this information and committing to regular maintenance, you can ensure a reliable and consistent supply of hot water, avoiding those dreaded cold showers. Don't let a tiny flame dictate your comfort any longer. Take control, apply what you've learned, and enjoy the endless warmth your gas water heater can provide. Have you experienced pilot light issues? Share your stories or ask questions in the comments below! If this guide helped you, consider sharing it with friends and family who might also benefit, or explore our other home maintenance articles for more practical tips.![Why Your Pilot Light Keeps Going Out & How To Fix [With Pictures]](https://www.supertechhvac.com/wp-content/uploads/2021/11/Pilot-Light-5-1-1229x2048-1.jpg)

Detail Author:
- Name : Hazel Ryan
- Username : gkuvalis
- Email : bill.dietrich@gmail.com
- Birthdate : 1985-01-31
- Address : 66891 Lesch Vista North Amara, ID 20703-1927
- Phone : (731) 762-5311
- Company : Boehm-Bednar
- Job : Human Resources Assistant
- Bio : Quia sequi autem voluptatem soluta. Soluta vel sit iste totam iste doloribus. Ut sint ipsum molestias eum.
Socials
tiktok:
- url : https://tiktok.com/@jerrold.gottlieb
- username : jerrold.gottlieb
- bio : Eum autem nobis recusandae expedita enim occaecati possimus.
- followers : 6171
- following : 920
linkedin:
- url : https://linkedin.com/in/jerrold_gottlieb
- username : jerrold_gottlieb
- bio : Et commodi occaecati fuga.
- followers : 4648
- following : 2741
